Your product page needs clean garment-only shots as much as model shots, right?
Flat-lay aerial shots, ghost shots that look like an invisible mannequin is wearing the piece, and hanger shots.
StyleRoom's Clothing Only menu has been updated with a new screen.
Now you can upload up to 10 clothing photos at once and generate them all in one go!
- WhatGenerate garment-only shots like aerial, ghost and hanger shots from clothing photos.
- How manyUp to 10 garments at once, one image per garment.
- HowJust follow three panels: Garment photos → Shot type → Results.
- GuideThe StyleRoom AI chat on the right tells you what to do at each step.
01 · WhatThe new garment-only shot screen, in three panels
When you open Clothing Only, the screen is split into three panels.
"Garment photos" on the left, "Shot type" at the top middle, and "Results" below it.
On PC the panels are connected by lines so you can see the order at a glance,
and on mobile they're stacked vertically in order.

On the right is the StyleRoom AI chat.
Its first question is "How many garments do you have?"
Select [One garment] or [Several at once], and it tells you what to do next.
02 · HowHow to make garment-only shots
Select "Upload photos" to add your clothing photos.
One photo is one garment, and you can add up to 10 at a time.
Each garment gets its own card, where you can choose front or back.
TIP. Add photos that clearly show buttons, logos or fabric texture in the card's "Detail photo (optional)" slots for more accurate results!
Once you add a photo, AI automatically looks over each garment's material and design.
Garments that are done show "Analysis complete".
Curious about the details? Select "View/edit analysis" on the garment card.
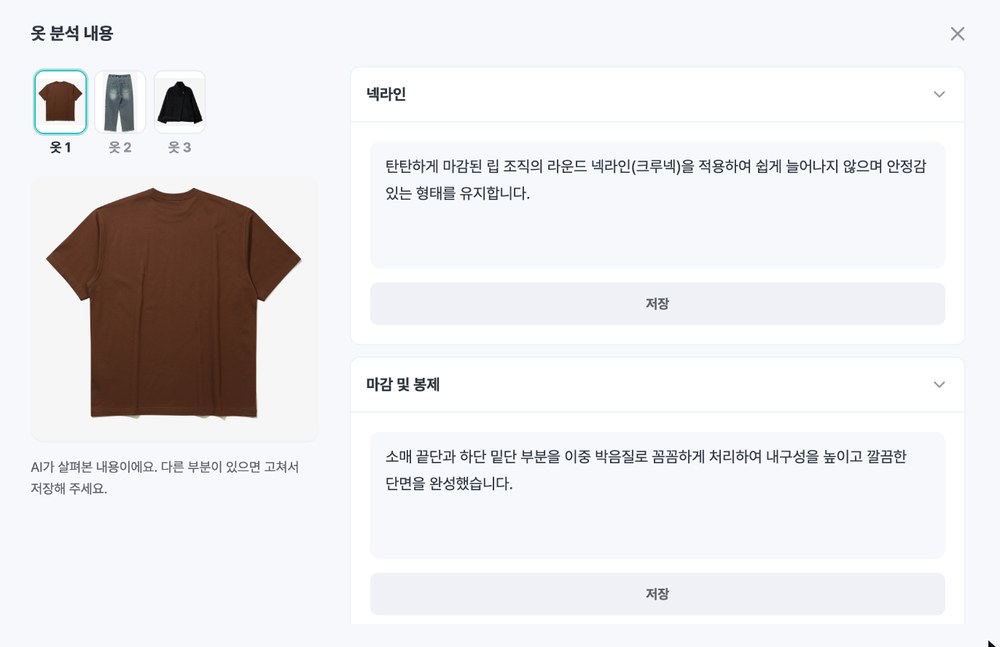
What AI found is organized by item, such as neckline and finishing.
If anything differs from the actual garment, just fix it right there and save.
Switch between garment 1, 2 and 3 at the top to check them all in one panel.
When the analysis is done, the chat asks "Which shot type should I generate?"
There are three shot types.
- Aerial Shot Clothing laid flat on a bright background
- Ghost Shot A three-dimensional look, as if worn by an invisible mannequin
- Hanger Shot Neatly hung on a hanger
You can choose in the chat or right in the "Shot type" panel.
In the same panel you can also set the aspect ratio and image size.

Once you choose a shot type, the chat tells you the credits before you generate, like "3 garment(s), 3 credit(s) in total".
Select "Generate" and one image is made per garment.
The results appear one by one in the "Results" panel below.
You can zoom in on the results.
Download them one by one, or all at once with "Download all".
You can even add more garments while it's generating.
Next time you select Generate, only the newly added garments are generated.
03 · TipWant to generate again?
If you're not happy with a result, try generating again.
New results are added next to the existing ones, so you can compare them side by side.
If any garment couldn't be generated, the chat tells you how many.
Use "Generate again" in Results to remake just those garments.
04 · FAQGarment-only shots: frequently asked questions
How many garments can I do at once?
Up to 10 garments at a time.
One photo is one garment, and one image is generated per garment.
How many credits does it use?
One image's credits for the chosen image size, times the number of garments.
Before you generate, the "Generate" button and the chat show the total credits.
What if the AI got my garment wrong?
Select "View/edit analysis" on the garment card, fix what's different and save.
The image is generated with your edits.
What about garments that failed to generate?
Select "Generate again" in Results.
Credits for garments that couldn't be generated are refunded automatically within a few minutes.
Just clothing photos, and your cut-out shots in one go.
Make the garment-only shots for your product page today.