The last two parts were about fit. Describing it in words doesn't work, and splitting the vocabulary finer doesn't work either. So we tried training a model directly on a brand's clothes.
Fit wasn't why we ran this experiment. We had already seen fit carry over with an earlier brand. What we wanted to check this time was how the model dresses those clothes.
The pitch this experiment set out to test
"We've already trained on your brand."
"From now on, whenever a new piece drops, just send us a single photo of the garment. We'll style it in your brand's mood and deliver shots ready for your product detail page."
Brands shoot a lookbook every time new pieces come out. They book models, reserve a studio, and a stylist matches the shoes and accessories. Every lookbook a brand has shot so far already contains how that brand dresses its clothes.
Here's what happened. Put in a single pair of pants, and a top gets created and the whole outfit comes out styled. We never put in a top.
01 · The Setup
Training works by feeding in questions paired with answers. The question is one product shot of a pair of pants; the answer is one lookbook photo of someone wearing those pants.

We built 114 of these pairs and fed them in. That works out to 114 garments.
And we deliberately held back eleven garments. Those eleven never went into training. Once training was done, we fed in only their product shots and set the results side by side with the lookbook shots the brand had actually taken.
The reason for holding them back is simple. If you check results on garments that were in training, you can't tell whether the model memorized those garments or learned the brand.
That said, we don't call the lookbook shot next to it the correct answer. The brand shot several photos with each pair of pants, and some put a different top with the same pants. Our result isn't wrong just because it differs from that one photo.
02 · What Came Back
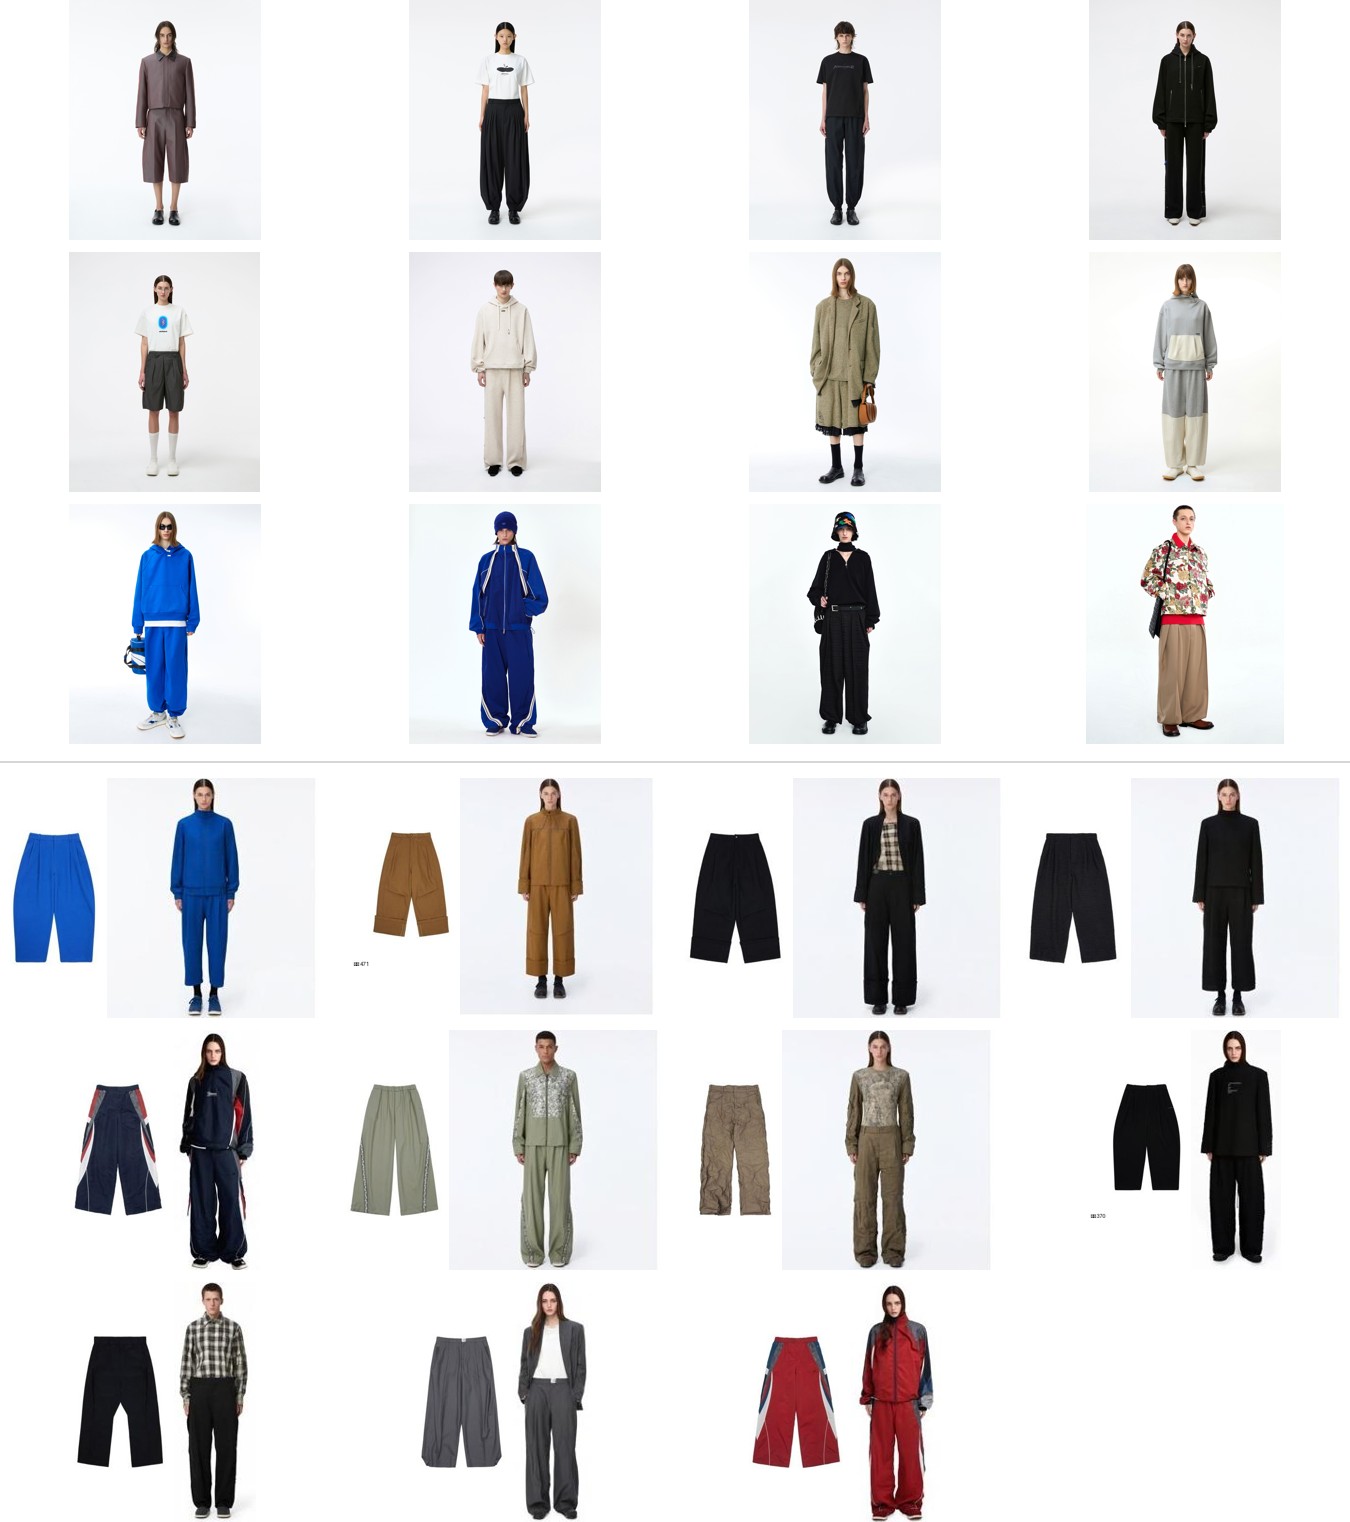
The input is one pair of pants. We never put in a top, yet all eleven came out with a top. Not just any top, either: what comes out is the one outfit you'd expect this brand to put together with those pants.
- It makes a set: it adds a top in the same fabric and color as the bottoms. Eight of the eleven came out this way
- The color blocking carries over: the red and gray panels on the track pants show up on the jacket too
- The details carry over: pants with embroidery down the side get a jacket with the same embroidery
- It layers underneath: a check shirt under a black outer layer, or a white inner under a gray suit
A few of them are hard to put down to chance.
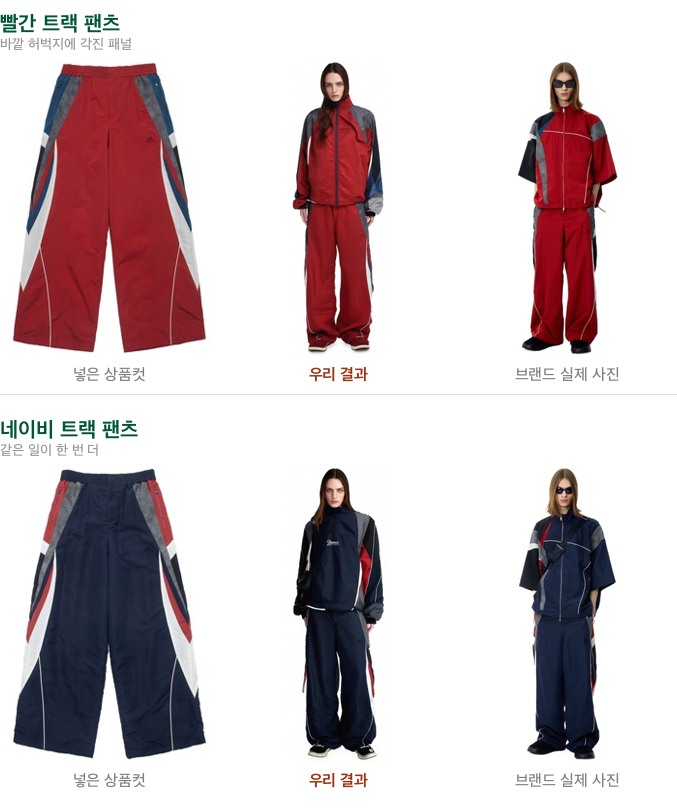
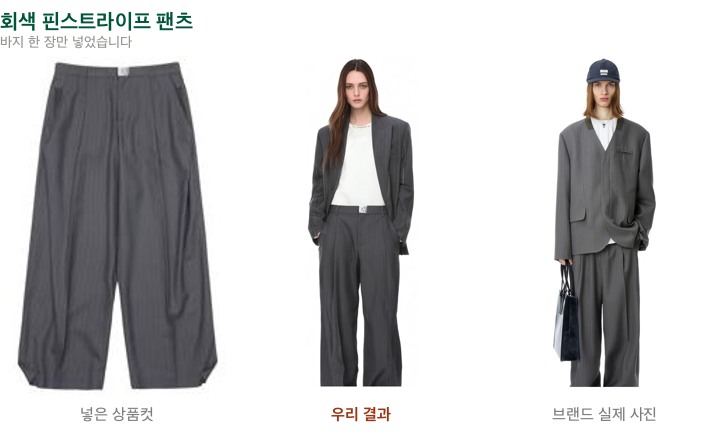
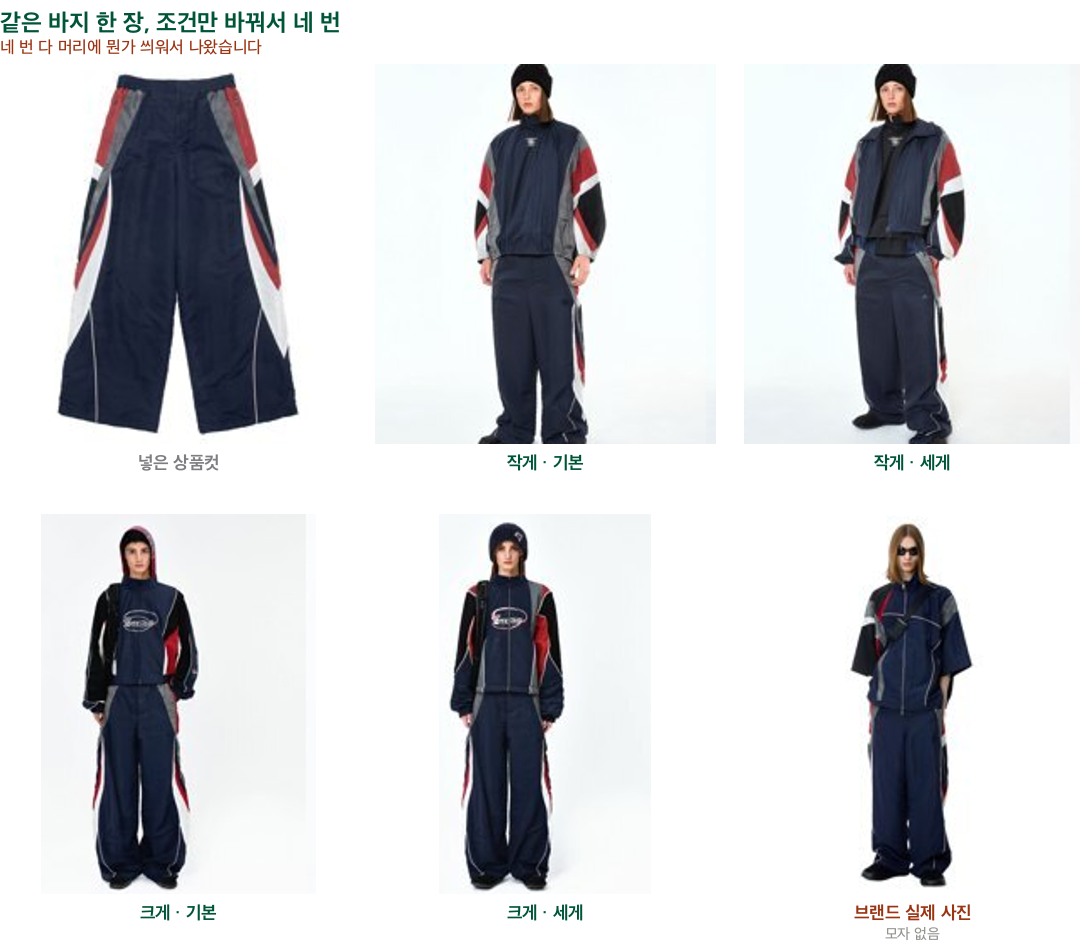
This isn't the right answer for this garment. It's just something the brand does often. But the fact that it keeps showing up even when the conditions change means it isn't a one-off accident.
That said, it uses this habit more often than the brand does. In the photos we trained on, 26 of 114 match top and bottom in the same fabric, while seven of the eleven results do.
03 · Where It Came From
Look again at the training pairs from earlier and the answer is there. What we put in was one pair of pants, but the photo we used as the answer also shows a jacket, shoes, socks and a bag. And yet the caption attached to that photo describes only the pants.
Here, the caption is a one-line description attached to each training photo. It states in a sentence what the garment is, and goes in together with the photo.
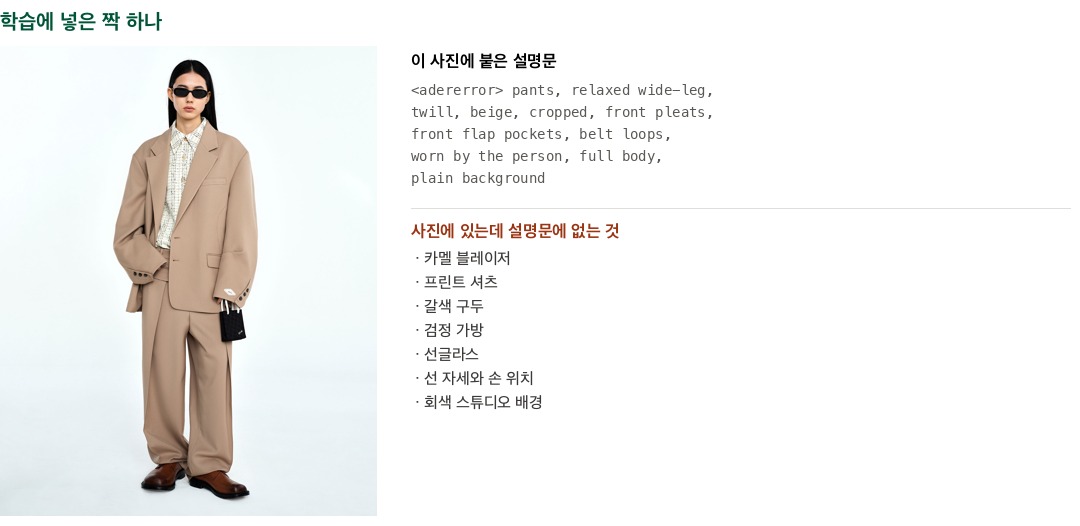
It learns what the caption doesn't say
Training pairs a photo with a sentence describing that photo. Whatever is in the photo but isn't explained by the sentence, the model folds into the brand's characteristics.
In this training set, the tails of all 114 captions were identical, down to the last character. Only the garment description differed; everything else was the same sentence. So the styling, the background and even the pose got learned along with it.
04 · Alpha
The brand feel was there. But the clothes looked like they were floating. The fabric came out flat, as if it had been painted on: convincing from a distance, but up close it didn't look like clothing.
Our first thought was this: what if we just apply what it learned more strongly?
What "applying it more strongly" means
In Part 1, we compared this approach to sticking a thin memo on top of a thick manual. The original model stays as it is, and a thin memo made from the brand's lookbook is layered on top.
We introduced a few values you can adjust there, and one of them decides how strongly that memo is applied. The default is 1.0. Raise it and the output moves further from the original and gets pulled more toward the memo. Set it to 0 and the memo isn't applied at all, so you get the original as is.
We raised it from 1.0 to 1.3.
It didn't work. Volume didn't grow consistently, and some garments actually shrank. The direction wasn't consistent either. Strength isn't the dial to turn. What training failed to capture doesn't appear no matter how strongly you apply it.
05 · Image Size
The floating look came down to texture. We had been shrinking the photos before feeding them into training, and fine information like the grain of the fabric was already lost at that stage.
We switched to feeding the photos in large and trained again. The missing detail came back. The pinstripes sharpened, the crepe texture came alive, and the side-seam tape started to show.

It wasn't the strength value that changed the result; it was how large we showed it the images.
06 · Too Much
Training means showing the model photos and tweaking it a little, over and over. We count one of those repetitions as one step. This training ran for 2,052 steps, and along the way we saved the intermediate state twenty-one times.
More steps don't make it better. Past a certain point, it starts producing the same thing every time. You see it most clearly in the shoes.
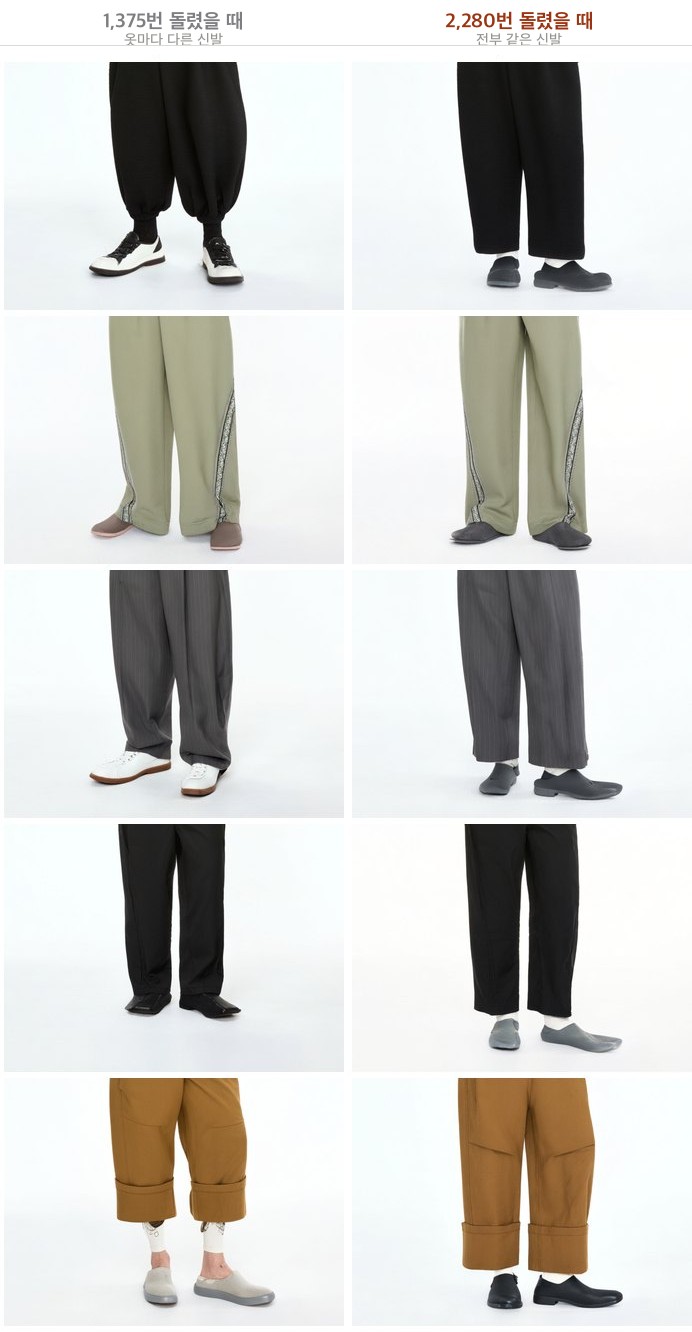
On the left, each garment got different shoes: white sneakers, loafers, pointed shoes and slip-ons all mixed in. On the right, every garment gets the same shape, whatever the clothes. In those extra steps, the shoes narrowed down to one kind.
The same thing happens to the background. The caption only called the background "plain". It never said what color. The model fills that blank with the gray it saw in training. Not the white background we'd been using, but the gray of the brand's studio.
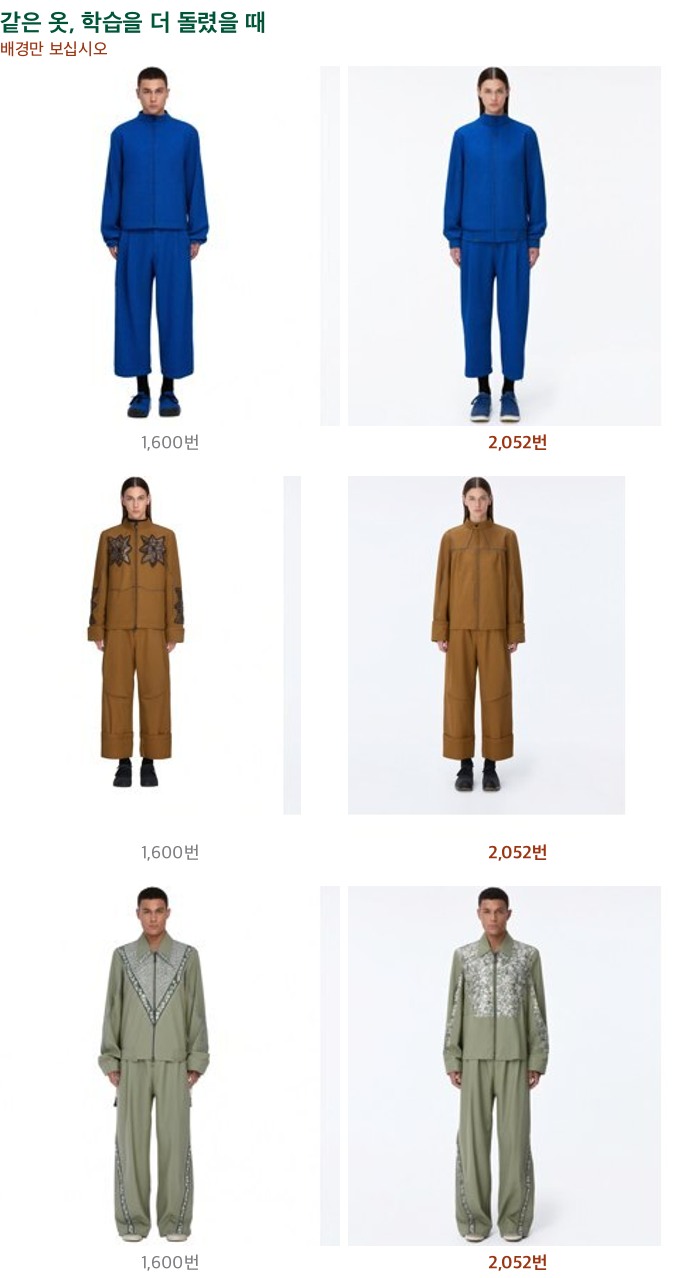
Background brightness (255 = pure white)
Actual worn-shot background 255.0 Midpoint checkpoints 254.8 to 254.9 Final checkpoint 248.5 ← 7 of the 11 garments at 242 to 246
Both times, the secondary elements broke down before the fit did. Fit keeps improving right to the end, so if you only watch fit, you miss this. The point where fit is best is not the point where the output is best.
So you shouldn't just use whatever state training ends in. You need to keep several intermediate states, line them up side by side, and pick one. In every training run we've done so far, the final state has never once been the best. And we added background brightness to the list of things we check when reviewing results. The eye misses it, but the numbers catch it.
07 · What We Take
| Question | Answer |
|---|---|
| Does training on a brand's lookbook copy its look and feel? | Yes. Color, color blocking, even the styling |
| Does it copy things we never taught it? | Yes. It creates and adds tops and shoes we never put in |
| Does it work on new pieces that weren't in training? | Yes. All eleven test garments were products outside the training set |
| Does raising the strength make it more pronounced? | No. We dropped that hypothesis |
| Does training longer make it better? | No. Past a certain point the output hardens |
The lookbooks a brand has shot so far contain the way that brand dresses its clothes. Training lets us draw that out and put it to use.
We also learned what to adjust: image size and where to stop training.
The next question is who writes those captions. The captions used in this training weren't written by people either. Gemini looked at the photos and wrote the sentences.
And we do the same thing in our service. When a seller uploads a garment photo, Gemini writes the product description. Then the seller edits it. Over fifteen thousand of those edits have piled up.
Everything Gemini gets wrong, and everything people fix, is in there. That's what the final part is about.